Published Book on Amazon
| All of IOT Starting with the Latest Raspberry Pi from Beginner to Advanced – Volume 1 | |
| All of IOT Starting with the Latest Raspberry Pi from Beginner to Advanced – Volume 2 |
출판된 한글판 도서
| 최신 라즈베리파이(Raspberry Pi)로 시작하는 사물인터넷(IOT)의 모든 것 – 초보에서 고급까지 (상) | |
| 최신 라즈베리파이(Raspberry Pi)로 시작하는 사물인터넷(IOT)의 모든 것 – 초보에서 고급까지 (하) |
Original Book Contents
12.2.2 Working user
12.2.2.1 Meaning or Working user
The working user is the User ID used for the current work. Typically, the logon user is the working user, but in some cases you can use a different user ID to process the work. For example, if the logon user is "pi", you can use the "root" user account instead of the "pi" user account to perform the tasks that require the root account.
To change the working user account, you must change the user account using a separate command. You can use "sudo su" command to do this, which will be explained below.
12.2.2.2 Confirming Working user by Terminal Information
You can easily see the working user at the Terminal. The first method for this is to use the information of the working user which is displayed on the screen by default. On the left side of the screen, you can see the user account displayed in white in the format of "working user@hostname". This information is displayed in white to distinguish it from logon users, while the logon user is displayed in green
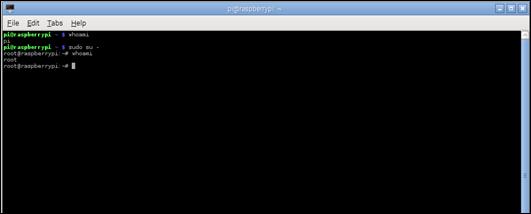
Figure 12‑3 Confirming current working user in terminal
12.2.2.3 Confirming Working user by "whoami" Command
Another way to confirm working user on the Terminal screen is to use the "whoami" command. In this way, you can see your working user account from anywhere.
[Command Format]
| whoami |
[Command Overview]
■ This displays working user.
■ User privilege -- Normal user.
[Detail Description]
■ None
[Used Example]
If user is first logged in with "pi", the current user is displayed as "pi", and after changing the working user to "root", the working user is displayed as "root".
| pi@raspberrypi ~ $ whoami |
| pi |
| pi@raspberrypi ~ $ sudo su - |
| root@raspberrypi:~# whoami |
| root |
| root@raspberrypi:~# |
12.2.2.4 Changing Working user with "su" Command
The "su" command makes a specified user to be the working user. This way, if you change the working user, it have the effect that every command executed in the future will always be executed with the newly specified user account even if there is no special instruction. If you do not specify a particular user while running the "su" command, it will be assumed that the super user is specified.
To return to the original logon user later, use the exit command.
[Command Format]
| su [options] [username] |
[Command Overview]
■ This changes the working user to the specified user.
■ User privilege -- Super user.
[Detail Description]
■ This command makes the specified user ID to be the working user. If you do not specify a User ID, it uses the super user by default.
■ If necessary, you can select an applied environment with option.
[Main Option]
| -h, --help | display this help message and exit |
| -c, --command COMMAND
| Specify a command that will be invoked by the shell using its -c.
The executed command will have no controlling terminal. This option cannot be used to execute interractive programs which need a controlling TTY. |
| -, -l, --login | Provide an environment similar to what the user would expect had the user logged in directly. When - is used, it must be specified as the last su option. The other forms (-l and --login) do not have this restriction. |
| -s, --shell SHELL | The shell that will be invoked. |
| -m, -p, --preserve-environment | Preserve the current environment, except for: |
[Used Example]
The following is an example of running the "su" command without adding the "sudo" command. Then, it is forced to input the password of the current user as follows to check the confirmation procedure. This is to prevent the careless execution in advance.
| pi@raspberrypi ~ $ su |
| Password: |
| root@raspberrypi:/home/pi# |
| root@raspberrypi:/home/pi# exit |
| exit |
| pi@raspberrypi ~ $ |
When you run the "su" command with adding "sudo" command, you can see the processing is as follows.
| pi@raspberrypi ~ $ sudo su |
| root@raspberrypi:/home/pi# |
| root@raspberrypi:/home/pi# exit |
| exit |
| pi@raspberrypi ~ $ |