Published Book on Amazon
| All of IOT Starting with the Latest Raspberry Pi from Beginner to Advanced – Volume 1 | |
| All of IOT Starting with the Latest Raspberry Pi from Beginner to Advanced – Volume 2 |
출판된 한글판 도서
| 최신 라즈베리파이(Raspberry Pi)로 시작하는 사물인터넷(IOT)의 모든 것 – 초보에서 고급까지 (상) | |
| 최신 라즈베리파이(Raspberry Pi)로 시작하는 사물인터넷(IOT)의 모든 것 – 초보에서 고급까지 (하) |
Original Book Contents
22.1.3 Pi camera를 이용한 사진 및 동영상 촬영
22.1.3.1 Pi camera 촬영 명령 개요
Raspberry Pi 전용 camera를 이용하면 다음과 같은 명령을 실행할 수 있다. 명령에 따라 정지화면을 촬영하거나 동영상을 촬영할 수 있는 기능이 있다.
■ raspistill 명령
이 명령은 정지화면을 capture한다. 촬영한 이미지는 "jpg" 파일로 저장한다.
■ raspiyuv 명령
이 명령은 정지화면을 capture한다. 이 명령은 encoder를 사용하지 않고, camera component에서 나오는 YUV or RGB output을 곧바로 파일로 보낸다.
■ raspivid 명령
이 명령은 동영상을 촬영한다. 촬영된 자료는 "H.264" format으로 파일에 저장한다.
모든 명령은 Shell에서 사용할 수 있고, MMAL API를 사용하도록 되어 있다. 모든 명령은 4개의 OpenMAX(MMAL) components인 "camera", "preview", "encoder", "null_sink"를 사용한다. 먼저 모든 명령은 "camera" component를 사용한다. "raspistill" 명령은 "Image Encoder" component를 사용하고, "raspivid" 명령은 "Video Encoder" component를 사용하며, "raspiyuv" 명령은 "encoder" component를 사용하지 않고, "camera" component에서 나오는 YUV or RGB output을 곧바로 file로 보낸다.
"preview" 화면은 선택적으로 사용할 수 있는데, 화면을 full screen이나 특정 크기의 사각형으로 처리할 수 있다. 만약 "preview"를 비활성화하면 "null_sink" component가 사용되어서 preview frame의 내용을 흡수하게 된다. "preview" frame은 exposure나 white balance settings을 계산하는데 사용되므로 비록 필요하지 않더라도 camera가 "preview" frames을 만들어 내는 것은 필요하다.
22.1.3.2 "raspistill" 명령을 이용한 사진 촬영하기
Raspberry Pi camera를 이용하여 사진을 촬영하기 위해서는 다음과 같이 "raspistill" 명령을 사용할 수 있다.
[명령 형식]
| raspistill [option] |
[명령 개요]
■ Raspberry Pi camera를 이용하여 사진을 촬영한다.
■ user 권한 -- 일반 user.
[상세 설명]
■ 사진 촬영을 시작하면, 일정시간 동안 사진으로 찍을 풍경에 대해서 preview 화면을 보여주고, 그 시간이 끝나면 최종적으로 파일로 저장을 한다.
■ 이 프로그램은 기본적으로 사진을 jpg 형식의 파일로 저장한다. 필요한 경우 encoder를 이용하여 다른 format으로 변환할 수 있다.
[주요 option]
■ control option
| -?, --help | : This help information |
| -w, --width | : Set image width <size> |
| -h, --height | : Set image height <size> |
| -q, --quality | : Set jpeg quality <0 to 100> |
| -o, --output | : Output filename <filename> (to write to stdout, use '-o -'). If not specified, no file is saved |
| -d, --demo | : Run a demo mode (cycle through range of camera options, no capture) |
| -v, --verbose | : Output verbose information during run |
| -t, --timeout | : Time (in ms) before takes picture and shuts down (if not specified, set to 5s) |
| -e, --encoding | : Encoding to use for output file (jpg, bmp, gif, png) |
| -tl, --timelapse | : Timelapse mode. Takes a picture every <t>ms |
| -set, --settings | : Retrieve camera settings and write to stdout |
■ Preview option
| -p, --preview | : Preview window settings <'x,y,w,h'> |
| -f, --fullscreen | : Fullscreen preview mode |
| -op, --opacity | : Preview window opacity (0-255) |
| -n, --nopreview | : Do not display a preview window |
[사용 Example]
여기서는 아래와 같이 정지상태의 사진을 찍어 보도록 하겠다.
| pi@raspberrypi ~/Image_Camera $ raspistill -v -o test_snap1.jpg |
| raspistill Camera App v1.3.8
Width 2592, Height 1944, quality 85, filename test_snap1.jpg Time delay 5000, Raw no Thumbnail enabled Yes, width 64, height 48, quality 35 Link to latest frame enabled no Full resolution preview No Capture method : Single capture
Preview Yes, Full screen Yes Preview window 0,0,1024,768 Opacity 255 Sharpness 0, Contrast 0, Brightness 50 Saturation 0, ISO 0, Video Stabilisation No, Exposure compensation 0 Exposure Mode 'auto', AWB Mode 'auto', Image Effect 'none' Metering Mode 'average', Colour Effect Enabled No with U = 128, V = 128 Rotation 0, hflip No, vflip No ROI x 0.000000, y 0.000000, w 1.000000 h 1.000000 Camera component done Encoder component done Starting component connection stage Connecting camera preview port to video render. Connecting camera stills port to encoder input port Opening output file test_snap1.jpg Enabling encoder output port Starting capture 0 Finished capture 0 Closing down Close down completed, all components disconnected, disabled and destroyed |
위와 같이 "-v" option을 사용하면 사진 촬영에 대한 여러 가지 시스템 정보를 확인할 수 있다. 사진을 촬영할 때 적용한 여러 가지 조건이나 preview 모양이나 품질에 대한 정보 등을 보여준다.
지정된 preview 시간이 경과하면 사진의 내용이 파일로 저장된다. 사진 크기는 "width"와 "hight"에서 지정한 크기에 따라 정해지며, 지정된 "quality"에 따라서 정밀도가 정해진다.
| pi@raspberrypi ~/Image_Camera $ ls -l |
| total 2736 -rw-r--r-- 1 pi pi 2799282 May 13 14:06 test_snap1.jpg |
파일로 저장된 자료는 Desktop GUI window의 [File manager]에서 [Image Viewer]를 이용하면 사진의 내용을 확인할 수 있다.
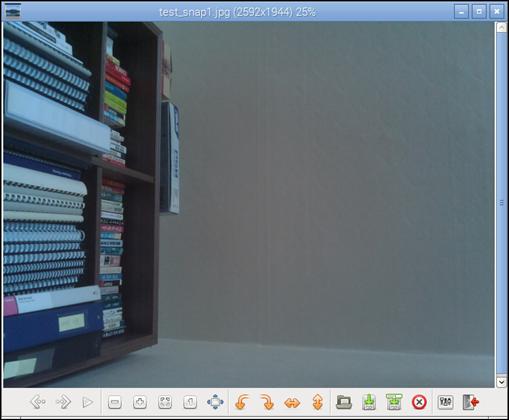
그림 22‑2 Desktop window의 [File manager]에서 [Image Viewer] 사용
다음은 [Image Viewer]에서 사진의 내용을 확인한 것이다.
22.1.3.3 "raspivid" 명령을 이용한 동영상 촬영하기
Raspberry Pi camera를 이용하여 동영상을 촬영하기 위해서는 다음과 같이 "raspivid" 명령을 사용할 수 있다.
[명령 형식]
| raspivid [option] |
[명령 개요]
■ Raspberry Pi camera를 이용하여 동영상을 촬영한다.
■ user 권한 -- 일반 user.
[상세 설명]
■ 동영상 촬영을 시작하면, 지정된 시간 동안 찍을 풍경에 대해서 preview 화면을 보여주고, 동시에 파일로 저장을 한다.
■ 이 프로그램은 기본적으로 동영상을 "H.264" 형식의 파일로 저장한다.
[주요 option]
■ Control option
| -?, --help | : This help information |
| -w, --width | : Set image width <size>. Default 1920 |
| -h, --height | : Set image height <size>. Default 1080 |
| -b, --bitrate | : Set bitrate. Use bits per second (e.g. 10MBits/s would be -b 10000000) |
| -fps, --framerate | : Specify the frames per second to record |
| -pf, --profile | : Specify H264 profile to use for encoding |
| -o, --output | : Output filename <filename> (to write to stdout, use '-o -'). If not specified, no file is saved |
| -d, --demo | : Run a demo mode (cycle through range of camera options, no capture) |
| -v, --verbose | : Output verbose information during run |
| -t, --timeout | : Time (in ms) to capture for. If not specified, set to 5s. Zero to disable |
| -td, --timed | Cycle between capture and pause. -cycle on,off where on is record time and off is pause time in ms |
| -set, --settings | : Retrieve camera settings and write to stdout |
■ Preview option
| -p, --preview | : Preview window settings <'x,y,w,h'> |
| -f, --fullscreen | : Fullscreen preview mode |
| -op, --opacity | : Preview window opacity (0-255) |
| -n, --nopreview | : Do not display a preview window |
[사용 Example]
여기서는 아래와 같이 동영상을 찍어 보도록 하겠다.
| pi@raspberrypi ~/Image_Camera $ raspivid -v -t 5000 -o test_motion1.h264 |
| raspivid Camera App v1.3.12
Width 1920, Height 1080, filename test_motion1.h264 bitrate 17000000, framerate 30, time delay 5000 H264 Profile high H264 Quantisation level 0, Inline headers No H264 Intra refresh type (null), period -1
~ ~ 중략 ~
Exposure Mode 'auto', AWB Mode 'auto', Image Effect 'none' Metering Mode 'average', Colour Effect Enabled No with U = 128, V = 128 Rotation 0, hflip No, vflip No ROI x 0.000000, y 0.000000, w 1.000000 h 1.000000 Camera component done Encoder component done Starting component connection stage Connecting camera preview port to preview input port Starting video preview Connecting camera stills port to encoder input port Opening output file "test_motion1.h264" Enabling encoder output port Starting video capture Finished capture Closing down Close down completed, all components disconnected, disabled and destroyed |
위와 같이 "-v" option을 사용하면 동영상 촬영에 대한 여러 가지 시스템 정보를 확인할 수 있다. 동영상을 촬영할 때 적용한 여러 가지 조건이나 동영상의 모양이나 품질에 대한 정보 등을 보여준다.
지정된 preview 시간이 경과하면, 동영상의 내용이 파일로 저장된다. 동영상의 크기는 "width"와 "hight"에서 지정한 크기에 따라 정해지며, 지정된 "quality"에 따라서 정밀도가 정해진다.
| pi@raspberrypi ~/Image_Camera $ ls -l |
| -rw-r--r-- 1 pi pi 10130926 May 13 15:21 test_motion1.h264 |